Joypad Auto Configuration
How does matching work?
RetroArch is shipped with a set of configuration files for the most common joypads. When you plug a joypad for the first time, we try to find a matching profile in our set.
The matching algorithm considers three criteria:
- Device name
- Vendor ID
- Product ID
We compute a matching score for each configuration file based on these three factors. The profile with the highest score is chosen to configure the pad.
Note: The Vendor ID and Product ID pair is often abbreviated as vid:pid.
Why is it needed?
RetroArch works many platforms. Each of these platforms has one or more input systems. These input systems in turn differ widely in the way they enumerate the pad buttons. For this reason, your joypad buttons may be mapped differently depending on if you are using Windows, Mac, or Linux.
Traditional emulators allow you map each button of your pad to the original pad of the emulated system. For example, this is how the Snes9x joypad configuration interface looks:
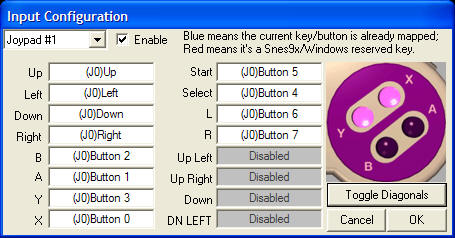
RetroArch also allows this kind of manual mapping. However, RetroArch tries to go further by detecting your joypad and automatically configuring it so manual configuration becomes obsolete.
Benefits
With RetroArch joypad auto-configuration system, your joypad will be recognized and will work out of the box.
This allows:
- Use many different joypads and have them attributed to each players like it would work on a real game console.
- Unplug the second joypad, and replace it by another one, even if it's of a different brand and model.
Having automatically configured joypads makes it a lot easier to navigate the RetroArch Menu with the joypad. This is very convenient when running RetroArch on a game console, where a keyboard and a mouse are not always available. It is also what makes RetroArch suitable to build your own game console using Lakka or a similar OS.
Before you begin
Make sure that you run the latest version of RetroArch, to generate a file name and file content via Settings -> Input -> RetroPad Binds -> Port 1 Controls -> Save Controller Profile that is up to date with our current policies.
Installing or updating joypad profiles
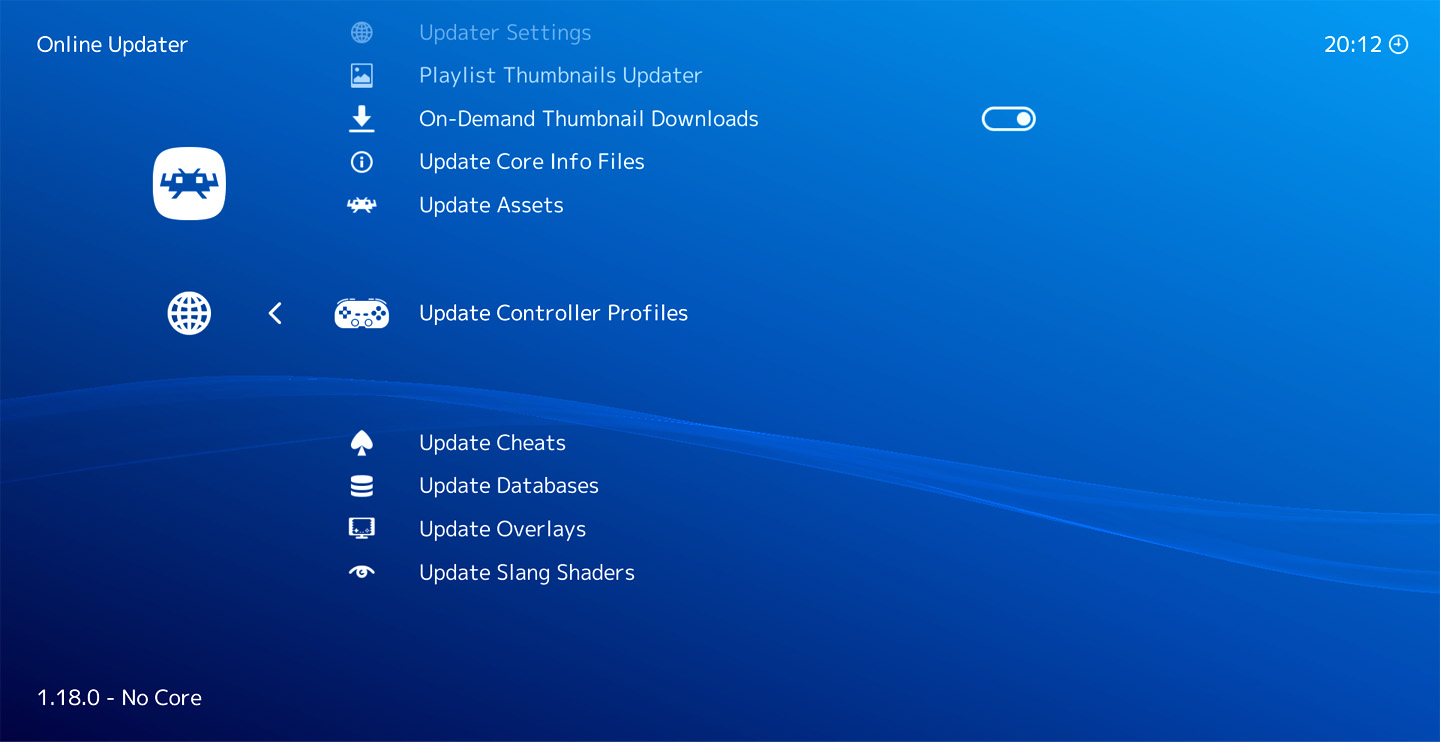
The set of joypad profiles used by RetroArch can be downloaded and updated from the menu. Go to Main Menu -> Online Updater -> Update Controller Profiles to get the latest version of the profile pack.
A message will appear at the bottom of the screen showing the download progress and the extraction of the archive.
Generating a joypad profile
If your joypad is not recognized by RetroArch even after updating the profiles, you can generate a profile from the menu.
- Unplug all the other joypads
- For Android, run the Android steps first.
- Use
Settings->Input->RetroPad Binds->Port 1 Controls->Set All Controls. - If applicable, then also set the menu button binding in
Settings->Input->Hotkeys->Menu Toggle - Use
Settings->Input->RetroPad Binds->Port 1 Controls->Save Controller Profile - The new profile file will be saved to your disk: [Controller profile directory]/[Controller driver]/[Device index].cfg.
Android configuration
Android phones that are not rooted you need to run these steps in order to backup your profile files or to Submit your profile to our joypad profile repository:
- Create /storage/emulated/0/RetroArch/autoconfig/android
- Change Settings -> Directory -> Controller Profiles from the default value /data/user/0/com.retroarch/autoconfig (root) to /storage/emulated/0/RetroArch/autoconfig. The Settings -> Input -> RetroPad Binds -> Port 1 Controls -> Save Controller Profile step above will now save the Android autoconfig files in /storage/emulated/0/RetroArch/autoconfig/android
Inspect the file
Without modifying anything in the original file, open it in the file in a text editor and
1. Make sure that you have mapped all buttons, and that none of them have duplicated values.
2. Each button should have a variable that ends with _btn, or _axis, not both. So for example, if you find both input_a_axis, and input_a_btn, it's incorrect. This may happen if your OS does not support the controller.
You can try to re-map missing buttons before you give up and save the controller once again, but please do NOT modify the variables manually if you are going to submit your profile to our joypad profile repository; We rely on automated data to debug the autoconfig files.
Try the controller
- If the controller support Bluetooth, make sure that that there's no Bluetooth latency.
- Make sure that your mapping is perfect by testing every button in the menu.
- Try all mappings by loading
Main Menu->Load Core->Start Remote RetroPad. If not all buttons is working with RetroPad, report it, and try a game in a core that uses all mappings on your controller. After you have loaded the game it's possible that you have to change the native controller to your controller inQuick Menu->Settings->Input->RetroPad Binds->Port 1 Controls->Device Index-- for example if you want to use both thumbsticks you have to changePS1toDualShockin PlayStation cores. If it's difficult for you to find a game that uses all buttons, you can setSettings->Input->Hotkeys(for example Save state, Load state, Fastforward, and Rewind) for unused buttons, so you can evaluate all mappings. - Use
Settings->Inputs->Port 1 Controls->Reset to Default Controlsto clear manual bindings and rely on the new profile. - Unplug your joypad an re-plug it. See if it is auto configured.
Warning "Clear manual bindings"
It is important to to skip the step of clearing manual bindings after using the Save Controller Profile command. In order to avoid issues using your profile in the future, remember to go to Settings -> Input -> RetroPad Binds -> Port 1 Controls -> Reset to Default Controls to reset the manual settings before completing this process.
If you are happy with your profile, you can submit it to RetroArch so that other users benefit:
- Edit the autoconfig file for your joypad manually to include the input descriptors (please see the Input descriptors section below)
- Submit your profile to our joypad profile repository.
Troubleshooting
If your joypad is not configured properly, you should generate a RetroArch log. Your log will show if a profile has been matched for your pad and the path of the corresponding profile.
Joypad auto-configuration file
Metadata
The first part of the joypad profile is used for matching the profile with the device, as explained above. The Vendor ID and Product ID are in decimal format.
input_driver = "udev"
input_device = "Sony Interactive Entertainment DualSense Edge Wireless Controller"
input_vendor_id = "1356"
input_product_id = "3570"
Mapping
The second part is the mapping itself, where each button is assigned to a button of the RetroPad (the joypad abstraction of RetroArch):
input_b_btn = "0"
input_y_btn = "2"
input_select_btn = "6"
input_start_btn = "7"
input_up_btn = "h0up"
input_down_btn = "h0down"
input_left_btn = "h0left"
input_right_btn = "h0right"
input_a_btn = "1"
input_x_btn = "3"
input_l_btn = "4"
input_r_btn = "5"
input_l2_axis = "+2"
input_r2_axis = "+5"
input_l3_btn = "9"
input_r3_btn = "10"
input_l_x_plus_axis = "+0"
input_l_x_minus_axis = "-0"
input_l_y_plus_axis = "+1"
input_l_y_minus_axis = "-1"
input_r_x_plus_axis = "+3"
input_r_x_minus_axis = "-3"
input_r_y_plus_axis = "+4"
input_r_y_minus_axis = "-4"
input_menu_toggle_btn = "8"
Input descriptors
The third part are input descriptors used by RetroArch to display the labels of the buttons as they are written on your joypad. So if you are using a DualShock pad, RetroArch will refer to the buttons as Cross, Circle, Square and Triangle.
input_b_btn_label = "A"
input_y_btn_label = "X"
input_select_btn_label = "Back"
input_start_btn_label = "Start"
input_up_btn_label = "D-Pad Up"
input_down_btn_label = "D-Pad Down"
input_left_btn_label = "D-Pad Left"
input_right_btn_label = "D-Pad Right"
input_a_btn_label = "B"
input_x_btn_label = "Y"
input_l_btn_label = "LB"
input_r_btn_label = "RB"
input_l2_axis_label = "LT"
input_r2_axis_label = "RT"
input_l3_btn_label = "Left Thumb"
input_r3_btn_label = "Right Thumb"
input_l_x_plus_axis_label = "Left Analog X+ (right)"
input_l_x_minus_axis_label = "Left Analog X- (left)"
input_l_y_plus_axis_label = "Left Analog Y+ (down)"
input_l_y_minus_axis_label = "Left Analog Y- (up)"
input_r_x_plus_axis_label = "Right Analog X+ (right)"
input_r_x_minus_axis_label = "Right Analog X- (left)"
input_r_y_plus_axis_label = "Right Analog Y+ (down)"
input_r_y_minus_axis_label = "Right Analog Y- (up)"
input_menu_toggle_btn_label = "Guide"