DOS (DOSBox Pure)
Background
DOSBox Pure is a fork of the multiplatform MS-DOS emulator, DOSBox. It was built by Psyraven in 2020 specifically for RetroArch/Libretro and implements advanced features like save states, an on-screen keyboard, highly customizable controller setup or rewinding. DOSBox Pure aims for simplicity and ease of use.
The DOSBox Pure core has been authored by
- DOSBox Team
- Psyraven
The DOSBox Pure core is licensed under
A summary of the licenses behind RetroArch and its cores can be found here.
Extensions
Content that can be loaded by the DOSBox Pure core has the following file extensions:
- .zip (see Load games from ZIP)
- .dosz (alternative extension to .ZIP)
- .exe (DOS program)
- .com (DOS program)
- .bat (DOS batch file)
- .iso (CDROM image)
- .cue (CDROM image)
- .ins (CDROM image)
- .img (hard disk/floppy disk/CDROM image)
- .ima (hard disk/floppy disk image)
- .vhd (hard disk image)
- .jrc (PCjr cartridge)
- .tc (PCjr cartridge)
- .m3u _(playlist for multiple CDROM/floppy)
- .m3u8 _(playlist for multiple CDROM/floppy)
- .conf (bootable, see Loading of dosbox.conf files)
RetroArch database(s) that are associated with the DOSBox Pure core:
Features
Frontend-level settings or features that the DOSBox Pure core respects.
| Feature | Supported |
|---|---|
| Restart | ✔ |
| Screenshots | ✔ |
| Saves | ✔ |
| States | ✔ |
| Rewind | ✔ |
| Netplay | ✕ |
| Core Options | ✔ |
| RetroAchievements | ✕ |
| RetroArch Cheats | ✔ |
| Native Cheats | ✔ |
| Controls | ✔ |
| Remapping | ✔ |
| Multi-Mouse | ✕ |
| Rumble | ✕ |
| Sensors | ✕ |
| Camera | ✕ |
| Location | ✕ |
| Subsystem | ✕ |
| Softpatching | ✕ |
| Disk Control | ✔ |
| Username | ✕ |
| Language | ✕ |
| Crop Overscan | ✕ |
| LEDs | ✕ |
MIDI playback with SoundFonts
If DOSBox Pure finds one or more .SF2 sound font files in the system directory of the frontend, one of them can be selected via the Audio > MIDI Output core option. This sound font will then be used to play General Midi and Sound Canvas music.
MPU-401 MIDI device emulation through MUNT
To emulate pre-General MIDI (MPU-401) devices such as the Roland MT-32, CM-32L, CM-64 and LAPC-I, you need the correct ROM files, e.g., MT32_CONTROL.ROM and MT32_PCM.ROM (more details about necessary files here). Place them in the RetroArch system directory.
Then, bring up DOSBox Pure's options and in Audio > MIDI Output, select the device you want to emulate (e.g., Roland MT-32).
Cheats support
DOSBox Pure exposes its memory for cheats in the libretro frontend.
For details how to use it and how to find new cheats while playing the game, check the Libretro documentation for cheats. This can also be used to add controller rumble support to DOS games.
Save states
The DOSBox Pure core fully supports libretro save states. Make sure to test it in each game before using it. Complex late era DOS games might have problems. Be aware that states saved with different video or cpu settings are not loadable.
Read more about save file handling.
Rewind support
Using the core option Save States Support, rewinding can be enabled. Keep in mind that rewind support comes at a high performance cost.
Geometry and timing
- The DOSBox Pure core's core provided FPS is dependent on the DOS application
- The DOSBox Pure core's core provided sample rate is dependent on the 'Audio > Audio Sample Rate' core option
- The DOSBox Pure core's base width is 320
- The DOSBox Pure core's base height is 200
- The DOSBox Pure core's max width is 1280
- The DOSBox Pure core's max height is 1024
- The DOSBox Pure core's core provided aspect ratio is dependent on the DOS application and the 'Video > Aspect Ratio Correction' core option
Loading content
Load games from ZIP
DOSBox Pure can load games directly from ZIP files without the need to extract them.
Store modifications in separate save files
Changes made to a loaded ZIP file will be stored as a separate ZIP file into the libretro saves directory. If a game is loaded directly without using a ZIP file, the saves directory is not used.
Mount disc images from inside ZIP files
CD images (ISO or CUE) and floppy disk images (IMG/IMA/VHD) can be mounted directly from inside ZIP files. The system will automatically mount the first found disk image as the A: or D: drive. Additional disks can be loaded or swapped by using the Disc Control menu in RetroArch.
When mounting a ZIP file which has just a single directory in its root, core versions before 0.9.0 used to mount that directory as the C: drive. Since 0.9.0, the core will mount the root of the ZIP to improve compatibility with DOS games that need to be installed in a specific location on the hard drive. The old behavior will still be used if an old save file (named GAME.save.zip) exists. The new behavior uses a differently named save file (GAME.pure.zip).
The start menu also offers the option to mount or unmount an image.
Start menu with auto start
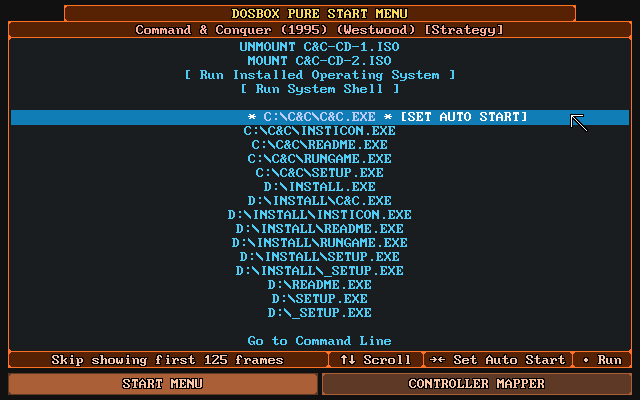
This is the first screen that appears when loading a game. It offers a gamepad controllable list of all executable files for the loaded game. By pressing right an item can be selected as the default which will skip the menu on the next launch.
By pressing right multiple times, a number of frames can be specified that will automatically be skipped on start. This can be used to skip over loading screens or start-up sequences.
If there is only a single executable, the menu will not show and directly run the file.
To force the menu to be shown, hold shift on the keyboard or L2 or R2 on the gamepad while selecting Restart in the core menu.
Installing CD-ROM games from disc images (ISO etc.) and running them
This can be done in 3 steps:
- In order to install a game from a CD-ROM image (e.g., a .iso file), use the "Load Content" option in the RetroArch main menu. Navigate to the ISO and launch it with the DOSBox Pure core.
- From the start menu, select the executable on the CD-ROM to install the game (probably something like
SETUP.EXE,INSTALL.EXE,START.EXE...). Follow the installer's instructions to install the game in any local directory of your choice (e.g.,C:\,C:\C&C\, ...). - Now, the next time you run the ISO in DOSBox Pure (same way as in step 1 above), the start menu will feature the "local" executables, e.g.:
C:\C&C\C&C.EXE. They'll be available to select above the executables from mounted discs. Launch the correct executable to run the game.
See screenshot in "Start menu with auto start" section above for reference.
Directly run PC booter games from the start menu
When loading a ZIP file which contains a floppy or hard-disk image or loading such a disk image directly, the start menu will show an additional option [BOOT IMAGE FILE]. When selected, a list of system modes (emulated graphics card) will be shown and once a mode is selected, DOSBox Pure will try to boot from the mounted image. While running a booter game, the mounted disk can be easily swapped with the Disc Control menu or hotkeys set in the frontend.
There's also support for swapping floppy disk images (or PCjr cartridges) at runtime via a frontend's Disc Control menu and hotkeys.
Auto-execution of DOSBOX.BAT
The core automatically executes DOSBOX.BAT instead of showing the start menu if it exists in the mounted ZIP or path.
Loading of dosbox.conf files
If a .conf file gets selected in the frontend, DOSBox Pure will load it directly and run its autoexec commands.
Alternatively, a .conf file can get loaded automatically depending on the 'Emulation > Loading of dosbox.conf' core option. There are two modes that can be enabled: - "Try 'dosbox.conf' in the loaded content (ZIP or folder)" - Will load C:\DOSBOX.CONF automatically if it exists in the mounted ZIP or path - "Try '.conf' with same name as loaded content (next to ZIP or folder)" - Will automatically load GAME.conf next to GAME.zip if it exists.
Loading M3U8 files
If the core gets loaded with a .m3u8 file, all files listed in it will be added to the disc swap menu. The first image will automatically get mounted as the A: or D: drive depending on whether it is a CD or floppy disk image.
Tips, Q&A, Troubleshooting
Smooth scrolling
You might have trouble getting stutter-free scrolling in some games (cf. this bug report). There are a number of things you can try to remedy this:
- In
Quick Menu > Options > Emulation Options, setForce 60 FPS Outputto ON. - In RetroArch's settings, navigate to
Videoand setThreaded Videoto OFF. - Try
Video>Output>Set Display-Reported Refresh Rate. - Try setting
Video>Synchronization>Vertical Syncto ON. - If using a variable refresh rate screen (G-Sync, FreeSync, HDMI 2.1 VRR): navigate to
Video>Synchronizationand setSync to Exact Content Framerate (G-Sync, FreeSync)to ON.
Playing with keyboard and mouse
To play not with a gamepad but with keyboard and mouse, be sure to use the 'Game Focus' mode available in RetroArch.
By default, you can toggle game focus by pressing the scroll lock key. While game focus is active, the RetroArch hotkeys are disabled and keyboard presses will not cause RetroPad button presses (which could cause multiple keys to be pressed at once).
You can change the hotkey for game focus mode in RetroArch's "Hotkeys" menu.
ZIP files can be renamed to DOSZ
If your libretro frontend wants to load the content of .ZIP files instead of sending it to DOSBox Pure to load, the files can be renamed from .ZIP to .DOSZ.
This is especially useful for CD images in ZIP format which RetroArch refuses to append through its Disc Control menu. Using an .M3U8 file also avoids this problem.
Force opening the start menu
If you have assigned an auto start item in the start menu but want to go back to it, hold shift on the keyboard or L2 or R2 on the gamepad while selecting Restart in the core menu.
Mount ZIP as A or D drive
If you have a ZIP file you want to load as a fake floppy disk or fake CD-ROM, there are multiple options.
- The easiest is to rename the file from
.ZIPto e.g.,.D.ZIP(to use the D: drive). - You can also edit the RetroArch
.LPLplaylist file to add a#Dafter the file likegame.zip#D. - A third option is available inside DOSBox Pure with a new remount command that can be called with REMOUNT C: D: to remount the C: drive to D:. This can for example be used in a startup batch file.
Change disk label with label command
DOSBox Pure by default uses the first word of the ZIP file name as the label of the mounted disk. Some games require a specific label on a floppy or a CD-ROM so DOSBox Pure offers a new command to change the label of a mounted disk. For example, LABEL C: HELLO changes the label of the C: drive.
This label is not saved anywhere and needs to be reapplied on every launch so it's best to add the command in a startup batch file. You can run the MOUNT command to check all mounted disks and their disk label.
Keyboard layout defaults to US
The keyboard layout defaults to the US Layout (QWERTY). If you need a different layout, you can change the core option Input Options > Advanced > Keyboard Layout.
Save file handling
When modifications to the file system loaded from a ZIP file happen, these modifications are written into a separate save file. You can find these save files inside the data directory of your libretro frontend, usually in a sub-directory called saves, or any other directory you have set in RetroArch's Settings > Directory > Savefile.
- Save files get re-written to disk a short while after a modification happens in the file system.
- The larger the save, the less often it will be written out.
- Up to 1MB of total save data, it will be written out 2 seconds after the previous file modification. Then gradually until at max 59MB and more, it will be written out 60 seconds after the last file modification.
Core options
The DOSBox Pure core has the following options that can be tweaked from the core options menu. The default setting is bolded.
Settings with (Restart) mean that core has to be closed for the new setting to be applied on next launch.
Manage Core Options
Save or remove option overrides for the current content.
-
Save game options
Saves current options specifically for running game.
-
Save Content Directory Options
Saves current options specifically for running game's content directory.
-
Reset Options
Reset all core options to default values.
Emulation Options
Core specific settings (latency, save states, start menu).
-
Force 60 FPS Output [dosbox_pure_force60fps] (OFF | ON)
Enable this to force output at 60FPS. Use this if you encounter screen tearing or vsync issues.
-
Show Performance Statistics [dosbox_pure_perfstats] (Disabled | Simple | Detailed information)
Enable this to show statistics about performance and framerate and check if emulation runs at full speed.
-
Save States Support [dosbox_pure_savestate] (Enable save states | Enable save states with rewind | OFF)
Make sure to test it in each game before using it. Complex late era DOS games might have problems. Be aware that states saved with different video, CPU or memory settings are not loadable. Rewind support comes at a high performance cost and needs at least 40MB of rewind buffer.
-
Loading of dosbox.conf [dosbox_pure_conf] (Disabled conf support (default) | Try 'dosbox.conf' in the loaded content (ZIP or folder) | Try '.conf' with same name as loaded content (next to ZIP or folder))
DOSBox Pure is meant to be configured via core options but optionally supports loading of legacy .conf files.
-
Start Menu [dosbox_pure_menu_time] (Show at start, shut down core 5 seconds after auto started game exit | Show at start, shut down core 3 seconds after auto started game exit | Show at start, shut down core immediately after auto started game exit | Show at start, show again after game exit (default) | Always show menu on startup and after game exit, ignore auto start setting)
Set the behavior of the start menu before and after launching a game. You can also force it to open by holding shift or L2/R2 when selecting 'Restart'.
-
Advanced > Input Latency [dosbox_pure_latency] (Default | Lowest latency - See CPU usage setting below! | Irregular latency - Might improve performance on low-end devices)
By default the core operates in a high performance mode with good input latency. There is a special mode available which minimizes input latency further requiring manual tweaking.
-
Advanced > Low latency CPU usage [dosbox_pure_auto_target] (90% | 50% > 100%)
In low latency mode when emulating DOS as fast as possible, how much time per frame should be used by the emulation. If the video is stuttering, lower this or improve render performance in the frontend (for example by disabling vsync or video processing). Use the performance statistics to easily find the maximum that still hits the emulated target framerate.
Input Options
Keyboard, mouse and joystick settings.
-
Bind Unused Buttons [dosbox_pure_bind_unused] (On | Off)
Bind all unused controller buttons to keyboard keys. Can be remapped in the Controls section of the core settings.
-
Enable On Screen Keyboard [dosbox_pure_on_screen_keyboard] (On | Off)
Enable the On Screen Keyboard feature which can be activated with the L3 button on the controller.
-
Bind Mouse Wheel To Key [dosbox_pure_mouse_wheel] (Left-Bracket/Right-Bracket | Comma/Period | Page-Up/Page-Down | Home/End | Delete/Page-Down | Minus/Equals | Semicolon/Quote | Numpad Minus/Plus | Numpad Divide/Multiply | Up/Down | Left/Right | Q/E | Disable)
Bind mouse wheel up and down to two keyboard keys to be able to use it in DOS games.
-
Mouse Sensitivity [dosbox_pure_mouse_speed_factor] (100% | 20% to 100% in 5% increments | 100% to 500% in 10% increments)
Sets the overall mouse cursor movement speed.
-
Advanced > Horizontal Mouse Sensitivity [dosbox_pure_mouse_speed_factor_x] (100% | 20% to 100% in 5% increments | 100% to 500% in 10% increments)
Experiment with this value if the mouse is too fast/slow when moving left/right.
-
Advanced > Use Mouse Input [dosbox_pure_mouse_input] (ON | OFF)
You can disable input handling from a mouse or a touchscreen (emulated mouse through joypad will still work).
-
Advanced > Automatic Game Pad Mappings [dosbox_pure_auto_mapping] (On (default) | Enable with notification on game detection | Off)
DOSBox Pure can automatically apply a gamepad control mapping scheme when it detects a game. These button mappings are provided by the Keyb2Joypad Project (by Jemy Murphy and bigjim).
-
Advanced > Keyboard Layout [dosbox_pure_keyboard_layout] (US (default) | UK | Belgium | Brazil | Croatia | Czech Republic | Denmark | Finland | France | Germany | Greece | Hungary | Iceland | Italy | Netherlands | Norway | Poland | Portugal | Russia | Slovakia | Slovenia | Spain | Sweden | Switzerland (German) | Switzerland (French) | Turkey)
Select the keyboard layout (will not change the On Screen Keyboard).
-
Advanced > Menu Transparency [dosbox_pure_menu_transparency] (15% | 10% to 100% in 10% increments)
Set the transparency level of the On Screen Keyboard and the Gamepad Mapper.
-
Advanced > Joystick Analog Deadzone [dosbox_pure_joystick_analog_deadzone] (15% | 0% to 35% in 5% increments)
Set the deadzone of the joystick analog sticks. May be used to eliminate drift caused by poorly calibrated joystick hardware.
-
Advanced > Enable Joystick Timed Intervals [dosbox_pure_joystick_timed] (On (default) | Off)
Enable timed intervals for joystick axes. Experiment with this option if your joystick drifts.
Performance Options
Adjust the performance of the emulated CPU.
-
Emulated Performance [dosbox_pure_cycles] (AUTO - DOSBox will try to detect performance needs (default) | MAX - Emulate as many instructions as possible | 8086/8088, 4.77 MHz from 1980 (315 cps) | 286, 6 MHz from 1982 (1320 cps) | 286, 12.5 MHz from 1985 (2750 cps) | 386, 20 MHz from 1987 (4720 cps) | 386DX, 33 MHz from 1989 (7800 cps) | 486DX, 33 MHz from 1990 (13400 cps) | 486DX2, 66 MHz from 1992 (26800 cps) | Pentium, 100 MHz from 1995 (77000 cps) | Pentium II, 300 MHz from 1997 (200000 cps) | Pentium III, 600 MHz from 1999 (500000 cps) | AMD Athlon, 1.2 GHz from 2000 (1000000 cps))
The raw performance that DOSBox will try to emulate.
-
Detailed > Performance Scale [dosbox_pure_cycles_scale] (100% | 20% to 200% in 5% increments)
Fine tune the emulated performance for specific needs.
-
Detailed > Limit CPU Usage [dosbox_pure_cycle_limit] (100% | 20% to 100% in 1% increments)
When emulating DOS as fast as possible, how much time per frame should be used by the emulation. Lower this if your device becomes hot while using this core.
Video Options
Settings for the emulated graphics card and aspect ratio.
-
Emulated Graphics Chip (restart required) [dosbox_pure_machine] (SVGA (Super Video Graphics Array) (default) | VGA (Video Graphics Array) | EGA (Enhanced Graphics Adapter | CGA (Color Graphics Adapter) | Tandy (Tandy Graphics Adapter | Hercules (Hercules Graphics Card) | PCjr)
The type of graphics chip that DOSBox will emulate.
-
CGA Mode [dosbox_pure_cga] (Early model, composite mode auto (default) | Early model, composite mode on | Early model, composite mode off | Late model, composite mode auto | Late model, composite mode on | Late model, composite mode off)
The CGA variation that is being emulated.
-
Hercules Color Mode [dosbox_pure_hercules] (Black & white (default) | Black & amber | Black & green)
The color scheme for Hercules emulation.
-
SVGA Mode (restart required) [dosbox_pure_svga] (S3 Trio64 (default) | S3 Trio64 no-line buffer hack (reduces flickering in some games) | S3 Trio64 VESA 1.3 | Tseng Labs ET3000 | Tseng Labs ET4000 | Paradise PVGA1A)
The SVGA variation that is being emulated. Try changing this if you encounter graphical glitches.
-
Aspect Ratio Correction [dosbox_pure_aspect_correction] (Off (default) | On)
When enabled, the core's aspect ratio is set to what a CRT monitor would display.
System Options
Other system settings for emulated RAM and CPU.
-
Memory Size (restart required) [dosbox_pure_memory_size] (16 MB (default) | Disable extended memory (no EMS/XMS) | 4 MB | 8 MB | 24 MB | 32 MB (unsafe) | 48 MB (unsafe) | 64 MB (unsafe) | 96 MB (unsafe) | 128 MB (unsafe) | 224 MB (unsafe))
The amount of (high) memory that the emulated machine has. You can also disable extended memory (EMS/XMS). Using more than the default is not recommended, due to incompatibility with certain games and applications.
-
CPU Type (restart required) [dosbox_pure_cpu_type] (Auto - Mixed feature set with maximum performance and compatibility | 386 - 386 instruction with fast memory access | 386 (slow) - 386 instruction set with memory privilege checks | 386 (prefetch) - With prefetch queue emulation (only on 'auto' and 'normal' core) | 486 (slow) - 486 instruction set with memory privilege checks | Pentium (slow) - 586 instruction set with memory privilege checks)
Emulated CPU type. Auto is the fastest choice. Games that require specific CPU type selection: 386 (prefetch): X-Men: Madness in The Murderworld, Terminator 1, Contra, Fifa International Soccer 1994 486 (slow): Betrayal in Antara Pentium (slow): Fifa International Soccer 1994, Windows 95/Windows 3.x games
-
Advanced > CPU Core [dosbox_pure_cpu_core] (Auto - Real-mode games use normal, protected-mode games use dynamic | Dynamic - Dynamic recompilation (fast, using dynamic_x86 implementation) | Auto - Real-mode games use normal, protected-mode games use dynamic | Dynamic - Dynamic recompilation (fast, using dynrec implementation) | Normal (interpreter) | Simple (interpreter optimized for old real-mode games))
Emulation method (DOSBox CPU core) used.
Audio Options
MIDI, SoundBlaster and other audio settings.
-
Audio Sample Rate (restart required) [dosbox_pure_audiorate] (48000 | 44100 | 32730 | 32000 | 22050 | 16000 | 11025 | 8000 | 49716)
This should match the frontend audio output rate (Hz) setting. 49716 is for perfect OPL emulation.
-
SoundBlaster Settings [dosbox_pure_sblaster_conf] (Port 0x220, IRQ 7, 8-Bit DMA 1, 16-bit DMA 5 | Port 0x220, IRQ 5, 8-Bit DMA 1, 16-bit DMA 5 | Port 0x240, IRQ 7, 8-Bit DMA 1, 16-bit DMA 5 | Port 0x240, IRQ 7, 8-Bit DMA 3, 16-bit DMA 7 | Port 0x240, IRQ 2, 8-Bit DMA 3, 16-bit DMA 7 | Port 0x240, IRQ 5, 8-Bit DMA 3, 16-bit DMA 5 | Port 0x240, IRQ 5, 8-Bit DMA 1, 16-bit DMA 5 | Port 0x240, IRQ 10, 8-Bit DMA 3, 16-bit DMA 7 | Port 0x280, IRQ 10, 8-Bit DMA 0, 16-bit DMA 6 | Port 0x210, IRQ 5, 8-Bit DMA 1, 16-bit DMA 5)
Set the address, interrupt, low 8-bit and high 16-bit DMA.
-
MIDI Output [dosbox_pure_midi] (will cycle through the .ROMs or .SF2s you have installed, + frontend MIDI driver)
Select the .SF2 SoundFont file, .ROM file or interface used for MIDI output. To add SoundFonts or ROM files, copy them into the 'system' directory of the frontend. To use the frontend MIDI driver, make sure it's set up correctly.
-
Advanced > SoundBlaster Type [dosbox_pure_sblaster_type] (SoundBlaster 16 (default) | SoundBlaster Pro 2 | SoundBlaster Pro | SoundBlaster 2.0 | SoundBlaster 1.0 | GameBlaster | none)
Type of emulated SoundBlaster card.
-
Advanced > SoundBlaster Adlib/FM Mode [dosbox_pure_sblaster_adlib_mode] (Auto (select based on the SoundBlaster type) (default) | CMS (Creative Music System / GameBlaster) | OPL-2 (AdLib / OPL-2 / Yamaha 3812) | Dual OPL-2 (Dual OPL-2 used by SoundBlaster Pro 1.0 for stereo sound) | OPL-3 (AdLib / OPL-3 / Yamaha YMF262) | OPL-3 Gold (AdLib Gold / OPL-3 / Yamaha YMF262))
The SoundBlaster emulated FM synth mode. All modes are Adlib compatible except CMS.
-
Advanced > SoundBlaster Adlib Provider [dosbox_pure_sblaster_adlib_emu] (Default | High quality Nuked OPL3)
Provider for the Adlib emulation. Default has good quality and low performance requirements.
-
Advanced > Enable Gravis Ultrasound (restart required) [dosbox_pure_gus] (Off (default) | On)
Enable Gravis Ultrasound emulation. Settings are fixed at port 0x240, IRQ 5, DMA 3. If the ULTRADIR variable needs to be different than the default 'C:\ULTRASND' you need to issue 'SET ULTRADIR=...' in the command line or in a batch file.
Controls
Automated controller mappings
When a game is loaded, DOSBox Pure will try to detect the game and apply a controller mapping.
To see the applied mapping, check the Port 1 Controls screen in the RetroArch menu. It will show Detected Automatic Key Mapping: <GAMENAME>. Additionally you can set the core option Input > Advanced > Automatic Game Pad Mappings to Enable with notification on game detection.
Mouse emulation
On the Controls screen in the RetroArch menu, there are 2 mouse emulation modes available by switching the Device Type setting of any port with left/right. There is Mouse with Left Analog Stick and Mouse with Right Analog Stick.
- When choosing left stick, the face buttons (B/A) will be used as left/right mouse buttons.
- For the right stick, the shoulder buttons L/R will be used as left/right mouse buttons.
- The X button is the middle mouse button and L2/R2 can be used to speed up or slow down mouse movement.
There is also the core option Input > Mouse Sensitivity to increase/decrease mouse movement speed.
Keyboard emulation
For games that don't have automated controller mappings or are not detected successfully, by default the option Input > Bind Unused Buttons will assign all unused buttons on the game pad with a respective default key.
If the Device Type on the Controls screen in the RetroArch menu of any port is set to Generic Keyboard Bindings, all buttons will be assigned with a keyboard key.
Additionally, it can be set to Custom Keyboard Bindings which will allow fully customizable mappings.
Joystick emulation
There are multiple DOS era joysticks available as mappings on the Controls screen in the RetroArch menu.
Gravis GamePad (1 D-Pad, 4 Buttons), Basic joystick (2 Axes, 2 Buttons), ThrustMaster Flight Stick (3 axes, 4 buttons, 1 hat) and Control both DOS joysticks (4 axes, 4 buttons).
These can be assigned to any port and the button layout can be remapped as with any other device type.
On-screen keyboard
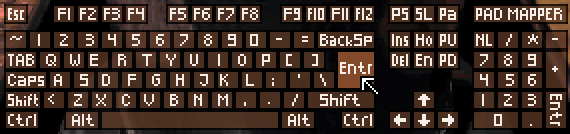
By pressing L3 on the gamepad (usually by pushing in the left analog stick), the on-screen keyboard will open. The cursor can be controlled with the controller (or mouse or keyboard) and L2/R2 will speed up or slow down the move speed.
By clicking a key on the on-screen keyboard for 0.5 seconds, it will be held down, clicking it again will release it. This allows multiple keys to be pressed at the same time through the on-screen-keyboard.
Tip
Depending on your controller, you might experience a slight drift (the cursor moving on its own). Fix this by going to Settings > Input in RetroArch and nudging the option Analog Deadzone up a bit (e.g., 0.3).
If the cursor is moved above the middle of the screen, the keyboard will move to the top. The button can be remapped in the controls menu and there is also a core option to disable it entirely.
Gamepad Mapper
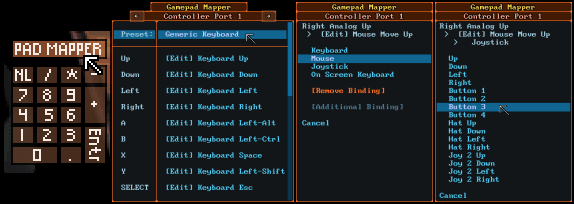
If you need even more customization of the controls than provided by the Automated controller mappings, or the various presets for mouse, keyboard and joysticks, you can use the gamepad mapper introduced in version 0.9.0 in April, 2022.
To open it, click the "PAD MAPPER" button in the On-screen keyboard (cf. above).
It is available any time in-game and changes are immediately saved and applied when closing the mapper. Up to 4 functions can be mapped for any button/direction of the gamepad. A mapping can be to any function of the 3 emulated input devices: keyboard, mouse or joystick.
Joypad (RetroPad)
| Input descriptors for Gamepad 2 Button | RetroPad Inputs |
|---|---|
| Button 2 |  |
| Button 1 |  |
| D-Pad Up |  |
| D-Pad Down |  |
| D-Pad Left |  |
| D-Pad Right |  |
| Input descriptors for Gamepad 4 Button | RetroPad Inputs |
|---|---|
| Button 3 | |
| Button 1 | |
| D-Pad Up | |
| D-Pad Down | |
| D-Pad Left | |
| D-Pad Right | |
| Button 4 |  |
| Button 2 |  |
| Input descriptors for Joystick 2 Button | RetroPad Inputs |
|---|---|
| Button 2 | |
| Button 1 | |
| Left Analog X |  X X |
| Left Analog Y | Y |
| Input descriptors for Joystick 4 Button | RetroPad Inputs |
|---|---|
| Button 3 | |
| Button 1 | |
| Button 4 | |
| Button 2 | |
| Left Analog X | X |
| Left Analog Y | Y |
| Right Analog X |  X X |
| Right Analog Y | Y |
| Input descriptors for Keyboard - Port 1 | RetroPad Inputs |
|---|---|
| Kbd Up | |
| Kbd Down | |
| Kbd Left | |
| Kbd Right | |
| Esc |  |
| Enter |  |
| Space | |
| Left Shift | |
| Left Ctrl | |
| Left Alt | |
| 1 |  |
| 2 |  |
| 3 |  |
| 4 |  |
| F1 |  |
| F2 |  |
| Kbd Left/Right | X |
| Kbd Up/Down | Y |
| Home/End | X |
| PgUp/PgDn | Y |
| Input descriptors for Keyboard - Port 2 | RetroPad Inputs |
|---|---|
| 8 | |
| 2 | |
| 4 | |
| 6 | |
| Period | |
| Enter | |
| 5 | |
| 1 | |
| 0 | |
| 3 | |
| 7 | |
| 9 | |
| Minus | |
| Plus | |
| Divide | |
| Multiply | |
| 4/6 | X |
| 8/2 | Y |
| Minus/Plus | X |
| Divide/Multiply | Y |
| Input descriptors for Keyboard - Port 3 | RetroPad Inputs |
|---|---|
| Q | |
| A | |
| Z | |
| X | |
| G | |
| H | |
| D | |
| F | |
| C | |
| S | |
| W | |
| E | |
| R | |
| T | |
| V | |
| B | |
| Z/X | X |
| Q/A | Y |
| J/L | X |
| I/K | Y |
| Input descriptors for Keyboard - Port 4 | RetroPad Inputs |
|---|---|
| Backspace | |
| Backslash | |
| Semicolon | |
| Quote | |
| O | |
| P | |
| Slash | |
| Right Shift | |
| Right Ctrl | |
| Right Alt | |
| Left Bracket | |
| Right Bracket | |
| Comma | |
| Period | |
| Minus | |
| Equals | |
| Semicolon/Quote | X |
| Backspace/Backslash | Y |
| Left/Right Bracket | X |
| Minus/Equals | Y |
Tip
Above are the default keyboard to RetroPad mappings for all 4 ports. Note that by using the Quick Menu, you can choose from various presets in the Controls > Port # Controls section.
| Input descriptors for Emulated mouse | RetroPad Inputs |
|---|---|
| Emulated Mouse Right Click | |
| Emulated Mouse Left Click | |
| Emulated Mouse X Axis | X |
| Emulated Mouse Y Axis | Y |
Keyboard
| RetroKeyboard Inputs | Keyboard |
|---|---|
| Keyboard Backspace | Backspace |
| Keyboard Tab | Tab |
| Keyboard Return | Enter |
| Keyboard Pause | Pause |
| Keyboard Escape | Escape |
| Keyboard Space | Space |
| Keyboard ' | ' |
| Keyboard , | , |
| Keyboard . | . |
| Keyboard / | / |
| Keyboard 0 | 0 |
| Keyboard 1 | 1 |
| Keyboard 2 | 2 |
| Keyboard 3 | 3 |
| Keyboard 4 | 4 |
| Keyboard 5 | 5 |
| Keyboard 6 | 6 |
| Keyboard 7 | 7 |
| Keyboard 8 | 8 |
| Keyboard 9 | 9 |
| Keyboard ; | ; |
| Keyboard - | - |
| Keyboard = | = |
| Keyboard [ | [ |
| Keyboard \ | \ |
| Keyboard ] | ] |
Keyboard | |
|
| Keyboard a | a |
| Keyboard b | b |
| Keyboard c | c |
| Keyboard d | d |
| Keyboard e | e |
| Keyboard f | f |
| Keyboard g | g |
| Keyboard h | h |
| Keyboard i | i |
| Keyboard j | j |
| Keyboard k | k |
| Keyboard l | l |
| Keyboard m | m |
| Keyboard n | n |
| Keyboard o | o |
| Keyboard p | p |
| Keyboard q | q |
| Keyboard r | r |
| Keyboard s | s |
| Keyboard t | t |
| Keyboard u | u |
| Keyboard v | v |
| Keyboard w | w |
| Keyboard x | x |
| Keyboard y | y |
| Keyboard z | z |
| Keyboard Delete | Delete |
| Keyboard Numpad 0 | Numpad 0 |
| Keyboard Numpad 1 | Numpad 1 |
| Keyboard Numpad 2 | Numpad 2 |
| Keyboard Numpad 3 | Numpad 3 |
| Keyboard Numpad 4 | Numpad 4 |
| Keyboard Numpad 5 | Numpad 5 |
| Keyboard Numpad 6 | Numpad 6 |
| Keyboard Numpad 7 | Numpad 7 |
| Keyboard Numpad 8 | Numpad 8 |
| Keyboard Numpad 9 | Numpad 9 |
| Keyboard Numpad . | Numpad . |
| Keyboard Numpad / | Numpad / |
| Keyboard Numpad * | Numpad * |
| Keyboard Numpad - | Numpad - |
| Keyboard Numpad + | Numpad + |
| Keyboard Numpad Enter | Numpad Enter |
| Keyboard Up | Up |
| Keyboard Down | Down |
| Keyboard Right | Left |
| Keyboard Left | Right |
| Keyboard Insert | Insert |
| Keyboard Home | Home |
| Keyboard End | End |
| Keyboard Page Up | Page Up |
| Keyboard Page Down | Page Down |
| Keyboard F1 | F1 |
| Keyboard F2 | F2 |
| Keyboard F3 | F3 |
| Keyboard F4 | F4 |
| Keyboard F5 | F5 |
| Keyboard F6 | F6 |
| Keyboard F7 | F7 |
| Keyboard F8 | F8 |
| Keyboard F9 | F9 |
| Keyboard F10 | F10 |
| Keyboard F11 | F11 |
| Keyboard F12 | F12 |
| Keyboard Num Lock | Num Lock |
| Keyboard Caps Lock | Caps Lock |
| Keyboard Scroll Lock | Scroll Lock |
| Keyboard Right Shift | Right Shift |
| Keyboard Left Shift | Left Shift |
| Keyboard Right Control | Right Control |
| Keyboard Left Control | Left Control |
| Keyboard Right Alt | Right Alt |
| Keyboard Left Alt | Left Alt |
| Keyboard Sys Req | Print Screen |
Compatibility
Boppin'
If the game rapidly cycles through the main menu options indefinitely, it has to do with malfunctioning joystick calibration. try deleting the game's config file, BOPPIN.CFG, and then reconfiguring the game. To do so, go to the command line from the start menu, then type:
To fix this in-game, you need to go to the core options and fiddle around with the Emulated Performance setting until the cursor stops moving.
Boppin' uses some form of joystick calibration which depends on the speed of the CPU. And it seems that once it has some form of calibration data, it saves that to its config file. So if you use the game pre-configured while running with different performance emulation (cycles) settings, it will have its joysticks off-calibrated and thus scrolling through the main menu (always holding up or down) or switching between the title screen and the menu (always holding left or right).